homepage
  • Your recently viewed scenarios
    • Wons Enough
      strategos played the scenario
      Prelude to Dying
      asloser played the scenario
      The Onslaught Resumes
      jrwusmc played the scenario
      Kazina Klash
      TiltingAtCthulhu played the scenario
      Costly Baptism
      TiltingAtCthulhu played the scenario
      Men Against Tanks
      manzoliandrea72 played the scenario
  • Not Logged In
  • Home
  • Shop for Scenarios
  • Article List
  • Reviews
  • Advanced Search
  • Game Search
  • Maps
  • Scenario Map
  • Games Wanted
  • Tournaments
  • Publications
  • Scenario Picker
  • Reports
    • Balance
    • Statistics
  • Contact
  • Events
  • Scenario Lists
  • Information
    • REST API
    • Privacy policy
    • Terms and Conditions
  • Login/Register
    • Login
    • Register
And the Walls Come A-Tumblin' Down PTO (id:#65871)
(HASL 11 - Sword & Fire: Manila ID: SF18)   [next]   [previous]
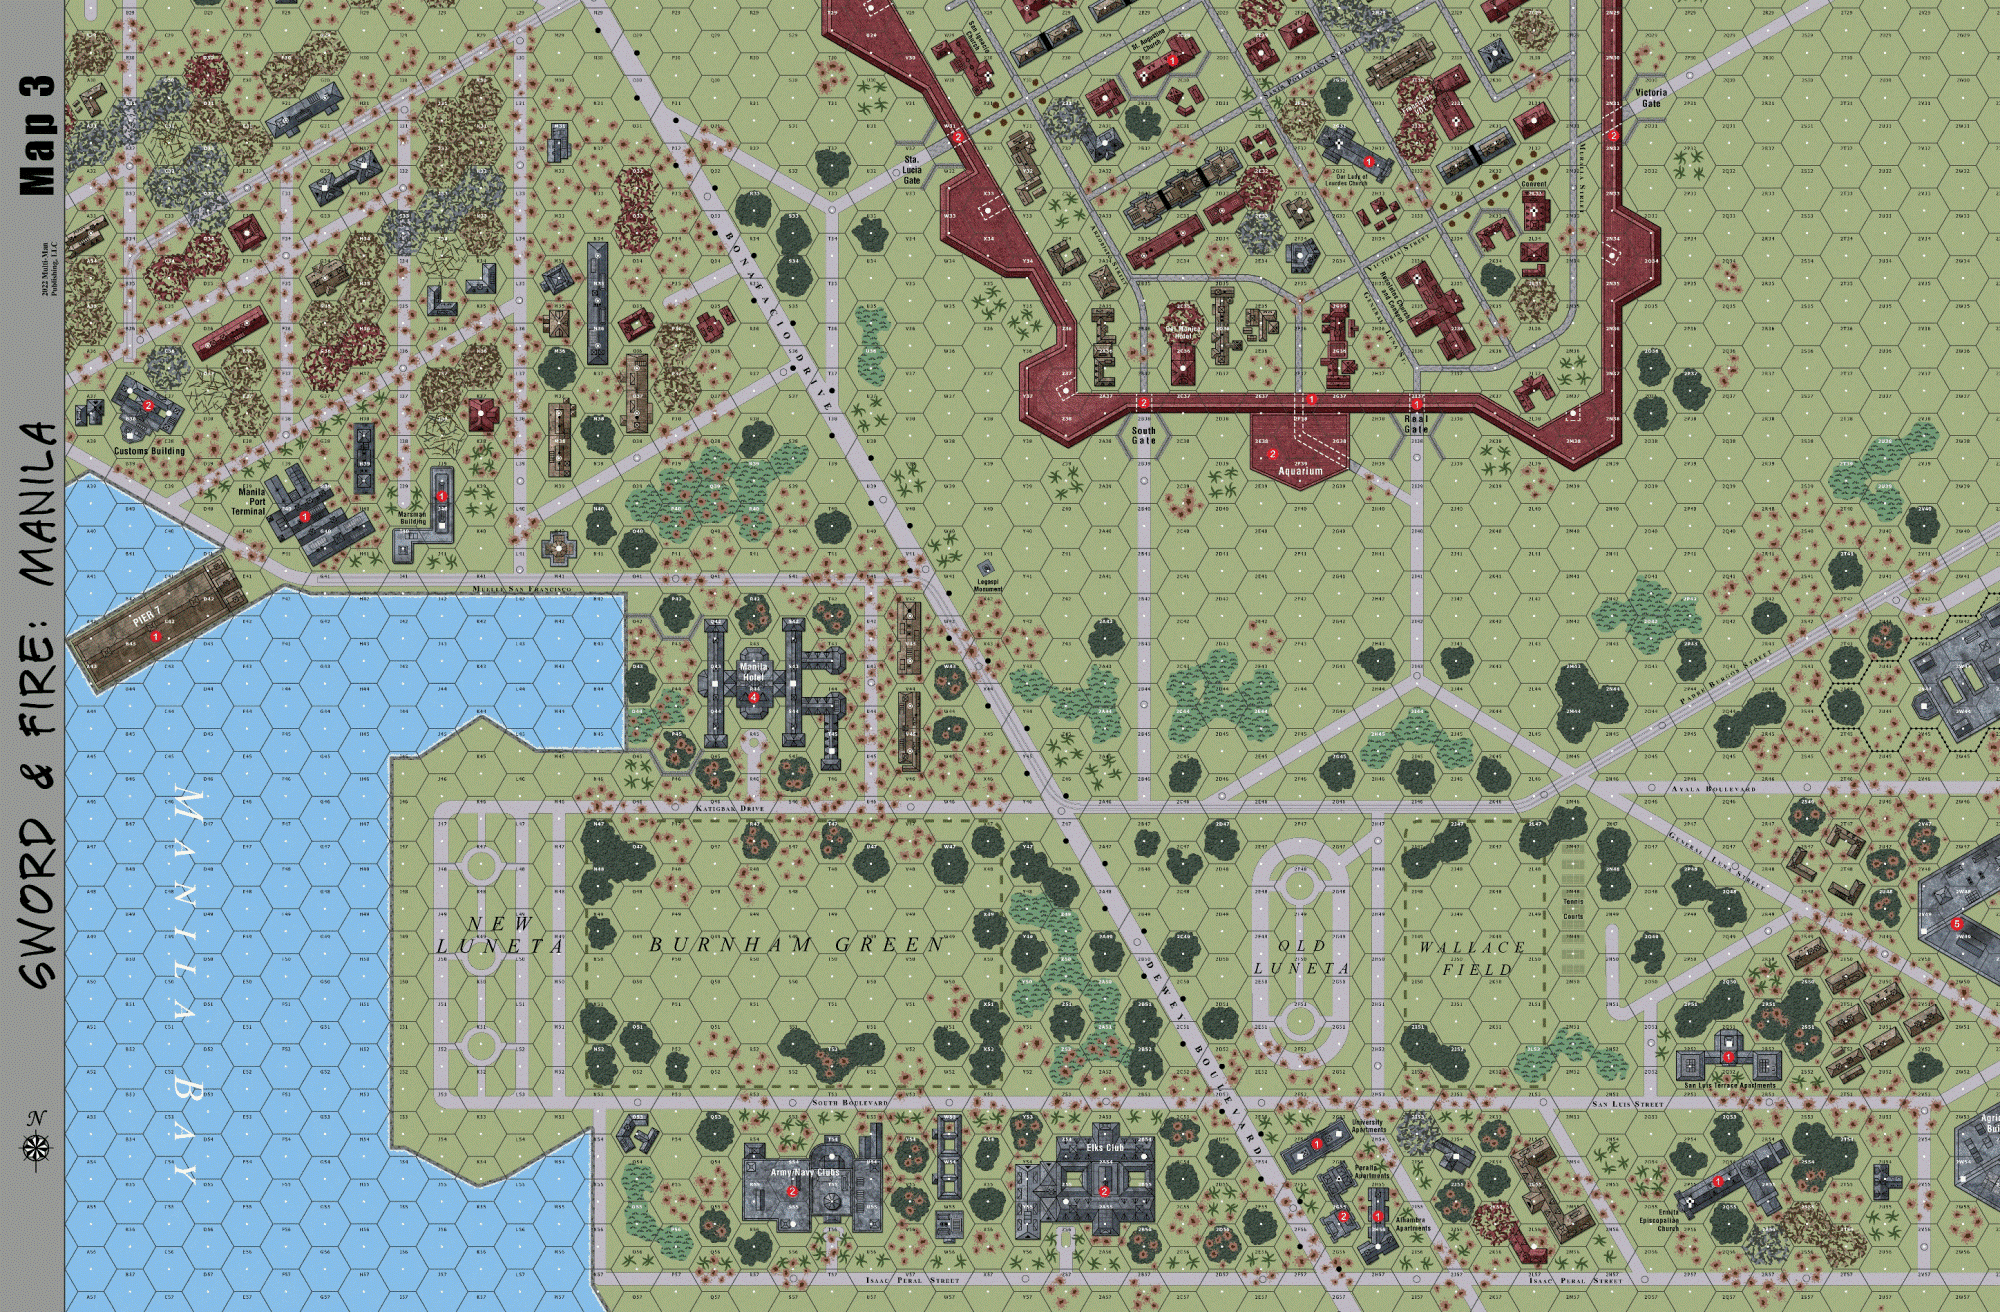
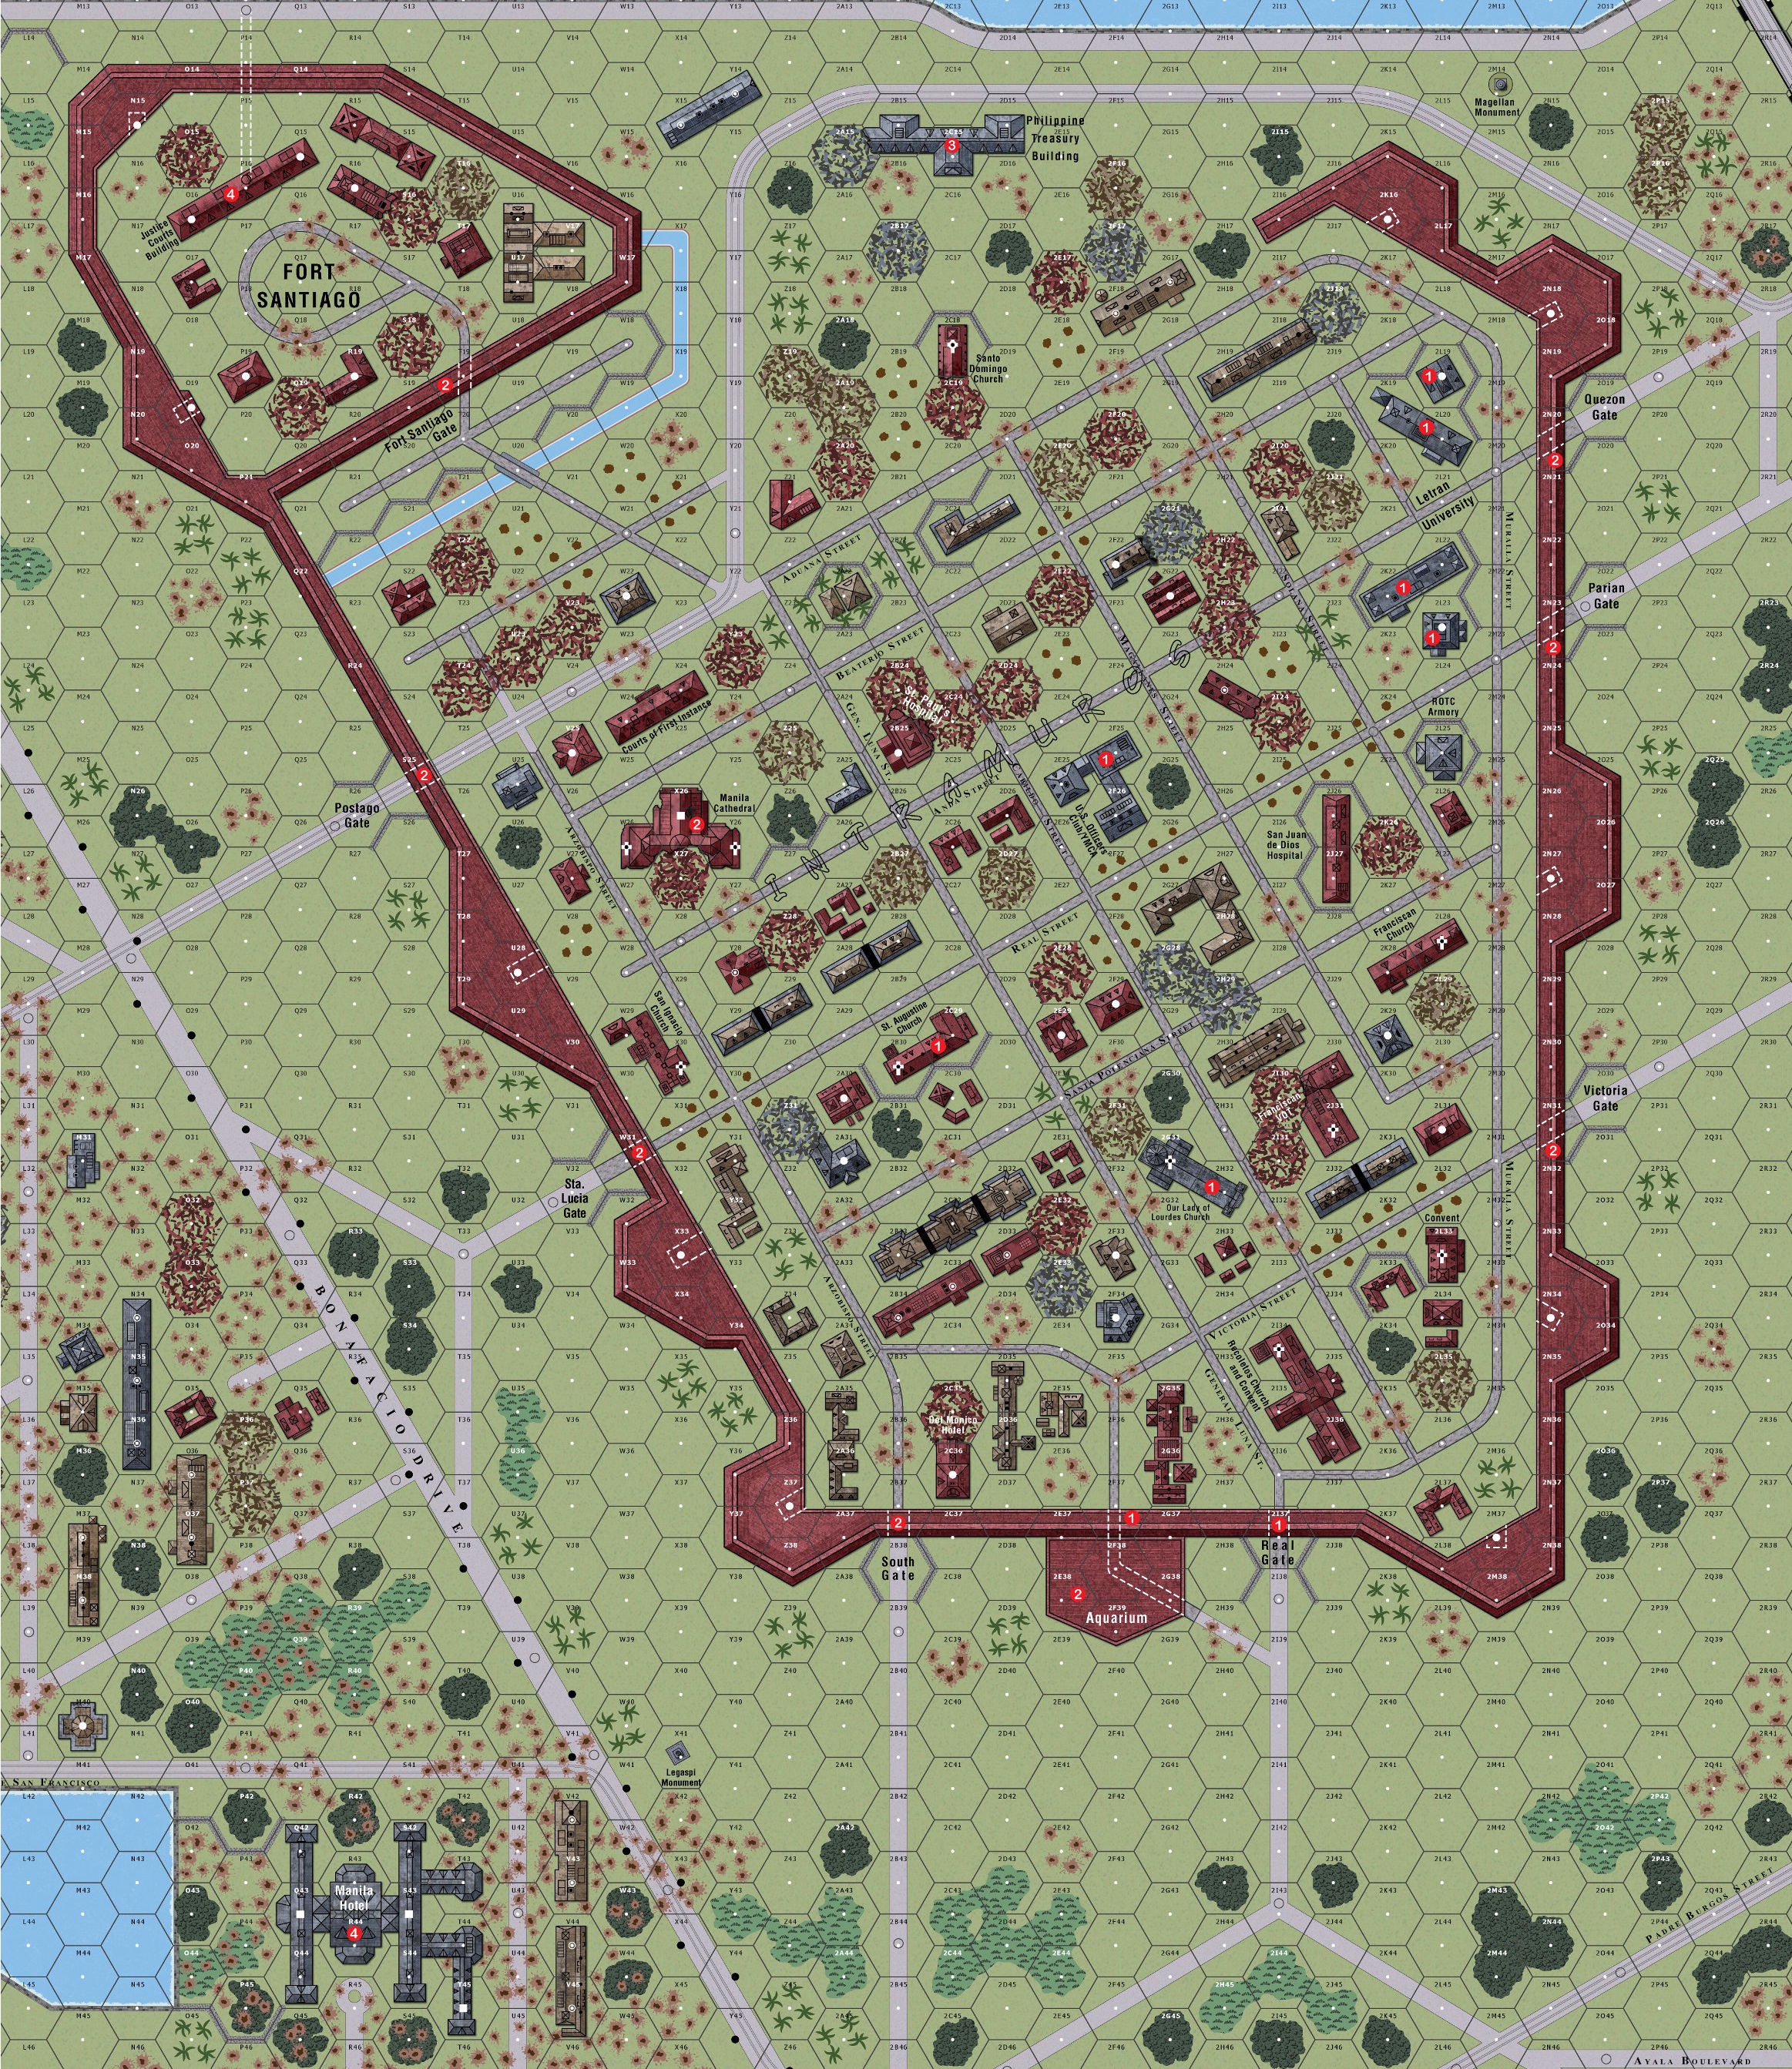
Intramuros, Manila, Luzon, Philippines 1945-02-23 (9 others)
G13: A View from the Top (AH:The General # 27.5)
U43: The Roer Bridgehead (Rivers to the Reich)
SF15: No Greater Love (HASL 11 - Sword & Fire: Manila)
SF16: Struggle Without End (HASL 11 - Sword & Fire: Manila)
SF17: Assault Across the Pasig (HASL 11 - Sword & Fire: Manila)
SF19: Fortress Within A Fortress (HASL 11 - Sword & Fire: Manila)
SF20: Through the Breach, Into the Fire (HASL 11 - Sword & Fire: Manila)
SF CG IV: The Walled City (HASL 11 - Sword & Fire: Manila)
SF21: A Mass for Humanity (HASL 11 - Sword & Fire: Manila)
Designer: David Roth
Starter kit scenario?:    Deluxe scenario?:
 
Balance:
AmericanJapanese
33.333333333333%

Overview:

Their virtually unopposed river crossing came as a welcome relief to the men of 3rd Battalion, 129th Regiment. Taking full advantage of the limited Japanese response, the Americans advanced deeper into the ruins of the ancient walled city, placing their left flank along Beaterio Street. As they moved west towards Fort Santiago the men of 3rd Battalion encountered ever increasing resistance as the Japanese slowly recovered from the heavy artillery shelling. 2nd Battalion of the 145th Regiment moved south of Beaterio Street, while 1st Battalion, 145th Regiment drove south towards the Aquarium. By now the Japanese were fully aware of the Gls' presence.
Attacker: American (3rd Battalion, 129th Infantry Regiment, and 1st and 2nd Battalions, 145th Infantry Regiment, 37th Infantry Division with 1st and 2nd Battalions, 754th Tank Battalion)
Defender: Japanese (2nd and 3rd Provisional Army Battalions and Central Force Headquarters Sector Unit)  
7.5 turns
    Players: 2     OBA: None     Night: No
Unit Counts:
Squads: A:17.0 D:12.0
AFVs: A:3
M4 x 3
Jeep x 2

AFVs: D:0
Guns: A:1
M3A1 37mm AT Gun
M2 60mm Mortar x 2
D:2
Type 96 25mm AA Gun Twin-Mount
Type 93 Twin-Mount High-Angle Machine Gun
Type 89 Heavy Grenade-Launcher x 2
Type 97 20mm Automatic Gun

Victory Conditions:

Exit VP: Building Control VC: Area Control VC:
Unit Based VC: LOS Style VC: CVP Cap:
Misc Rules: D: Fortified Buildings (B23.9), A: Civilian Intelligence (SF20.4), M4 (Note F)
Map Board(s):
MMP: SF1 MMP: SF3 Show/hide map dependencies
PublicationBoard
HASL 11 - Sword & Fire: ManilaMMP: SF1
HASL 11 - Sword & Fire: ManilaMMP: SF3
Overlays: NONE
Errata (source)
Players wanting to play this game/Request a match:

Scenario info

  • Recent Playings
  • Latest Updates
  • User Files
  • Public Lists
  • Comments
  • Links/References
Last Played:
DateReporterOpponentBal.ResultTimeComments
2026-04-29(D) Jeff B vs Scott Sherer Japanese win13.5 hrsI see I was beat to the punch in being the first to play and post, though when we had started I was shocked to see zero plays to date. I figured the bottom part of the map was included for a reason, and that reason was the basis for my dastardly defense. 100% of my force was set up south of the Intramuros. The bulk being as far west as I could muster, though my HIP units were set up further east as a sacrificial line of defense. During the RPh of Ami Turn 1 I broke almost all my infantry and routed back to the warehouse and woods, in preparation of rallying them and setting fire to them. When 100% of my force rallied, and three fires were lit, I couldn't have been happier. We did quickly realize that due to SF SSR only one kindle attempt was allowed and adjusted it. Either way, the bulk of my men were quickly ensconcing themselves in the Manila Hotel, while more than half the Ami force in the east were licking their wounds from the pasting my HIP boys dished out to them. Meanwhile it would take the other half of the Ami force 4 turns just to get into any type of threatening position. This scenario was looking to be a complete bust, and I wouldn't have blamed Scott one bit if he threw in the towel. But thankfully he pressed on, as it ended up being a fairly entertaining game when we played it to completion. Turn 2 saw the eastern Amis whittled down a squad as the Japs picked on their brokies, but they lost a MMG crew in return to some withering 0.50 HMG fire. A THH bungled a silver platter attack on a Sherman sitting next to them. Turn 3 saw the Amis in the north double-timing their way into position, the Amis in the east lose another HS, while the Japs there continued to get attrited, with three crews striping. Turn 4 saw the Amis lose another HS, while the Japs lost the other MMG crew and an AA gun blown to bits with a CH, but not before it knocked the treads off a Sherman. With the path looking relatively clear, Turn 5 saw the Shermans leave their fellow troops behind and move to the front. But the Japs still had a couple tricks up their sleeve in the form an LMG-toting HS and the other AA gun. The LMG promptly broke, but the well-positioned AA would not be so easily dealt with. Meanwhile the attack finally got underway in the west, with the Amis losing a squad to the Japs' HS. Turn 6 was quiet on the casualty count, with only an Ami HS lost; Turn 7 a bit more costly: 1.5 Ami/0.5 Jap. And so the last turn saw the full-on assault of the hotel with everything the Amis had left, which frankly wasn't a lot. As expected, it didn't go the Ami way, losing a squad to a HS for the Japs. And of course any Japs remaining at arms' length from any Amis broke and routed to avoid any further CC losses. Thus the final CVP count was 12-12, a much closer and entertaining game than I ever would've expected, but still probably a somewhat broken scenario.
2026-02-01(A) Kevin Duval vs Dwayne DuvalD Japanese winAmericans got the CVP needed early on but squandered the AFV to T-H-Heroes that allowed Japanese to reach my CVP cap , thus denying Americans the win.
View all or balance report
ActionDate
buser333 Added a playing2026-05-02 02:17:51
Kydder Added a playing2026-02-03 00:03:42
Kydder Rated the scenario2026-02-03 00:00:40
aokigaryou Uploaded the Board image2025-09-23 08:53:07
aokigaryou Uploaded an AAR2025-09-23 08:52:36
FileDescriptionUserViews
(!usa-jap.png)Imagehoxson11151
(SF18map.jpg)Map Imageaokigaryou505
DescriptionUploaded by
TitleAuthorDate
DescriptionUploaded by

Quick Map View

Location

Not Logged in

Images

 
Statistics:
Avg Rating: 6.00Votes: 3
Views: 0
To-Play list count: 0
Estimated Play time: 6.4 hours
Recorded Games: 2
Archive recorded plays:
American0
Japanese2
Drawn:0

ROAR Data: (as of today)
And the Walls Come A-Tumblin' Down
[Log in to Confirm or Edit]
[A] Japanese 1
[D] American 0
All Rights Reserved. (c)2022 Dave Ramsey.